As part of B's pre-maths skills we have been using these kinds of activities to work on size discrimination. One problem is explaining what he has to do - after big little and middle sized I kind of run out of vocabulary! Bob the Builder being one of his favourite characters I found and printed this Scrambler size sort from Tired Need Sleep. B was not into having photos taken of these and kept scooping them up to take them away so here is part of one very dodgy photo just in case you don't know who Scrambler is (Bob the Builder would be horrified ;) ) there are actually 8 shapes.
Pages
▼
Saturday, 31 December 2011
Size Sort : Master List
With the labels tab getting VERY long I am trying to organise things better by having some posts containing master lists of the resources available/linked to on this blog. These can be accessed from the tabs above.
This list is the Size Sort activities on the blog and will be updated periodically to include new additions.
Letter S: s is for Snowman:Size Sort
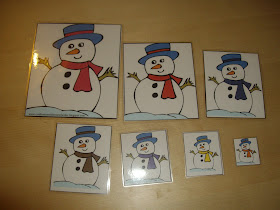
This is just one of the activities offered for free by Confessions of a Homeschooler for s is for snowman suitable for pre-K. It is one of those activities that B doesn't get (yet) and we have offered it and similar activities several times over the last year. Whilst three snowman is OK ("big. little and middle") any more than this is just a little confusing for B at the moment so if you are offering this kind of activity for the first time you might want try it with a smaller number of snowman at first.
To download the pdf go to this page and scroll down to the appropriate image to find the link to the file.
Thursday, 29 December 2011
Numeric Sequence Puzzles: Master list
With the labels tab getting VERY long I am trying to organise things better by having some posts containing master lists of the resources available/linked to on this blog. These can be accessed from the tabs above.
This list is the numeric sequence puzzle pages on the blog and will be updated periodically to include new additions.
Letter P: P is for Pig: Numeric Sequence puzzle
Here is another resource we prepared during the year for our pig day.
Letter P: P is for Pig:Magnet Page
Wednesday, 21 December 2011
Letter A: A is for angel: Magnet Page
In the spirit of the season we created this magnet page for the letter a.
As always use with round magnets, stones, bottle tops, dot-paint pens, pencils topped with erasers and ink pads,Q-Tips and paint, fingertips and paint, dot stickers or any other manipulatives that you can think of!
Download the pdf for free from here.
Download the pdf for free from here.
Wednesday, 14 December 2011
Reading Cave
This pin on pinterest inspired us this week and with the shops full of cheap Christmas lights now was the time of year to implement it.
Of course as always we didn't have the appropriate cardboard box but rather than be discouraged we put on our thinking caps and used the space under the dining room table instead (after all this is unused space most of the time). Filled with cushions and quilts and with battery operated lights on the underside of the tabletop we created a cosy, twinkly space to cuddle up and read or be read to.
Tuesday, 13 December 2011
Christmas clip cards and preschool pack
As a fan of clipcards for teaching B numbers and using fine motor skills at the same time I couldn't resist this set from the Christmas Symbols pack from 2Teaching Mommies. As always there are other activities in the download as well and all for free. The duo have also created other seasonal units with a similar range of preschool printables.
As you can see from the picture I laminated the cards and punched holes in the border at the top so they could be stored together on a split ring - add paper clips, bulldog clips or clothes pegs for a good busy bag activity.
Thursday, 1 December 2011
Transportation Theme: Numeric Sequence Train
B loves anything to do with vehicles - like the majority of little boys; so when I found this free train tot pack for download from lawteedah I knew I would be onto a winner. So far I have cherry-picked a few of the activities and one which B did perfectly first time (which was a pleasant surprise) was this number train.
The tot pack has two files containing the engine and numbered carriages (1 - 10). I printed these, laminated them and punched holes so they could be linked together. The links I used were from Learning Resources (via Amazon.co.uk) but there are many versions on the market. Good number practice plus a fine motor workout as well.
Wednesday, 23 November 2011
Transportation Theme File Folder Game
Like most little boys B loves vechicles. I decided to give the usual letters/numbers/shapes/colours games that I usually make for B a rest and try a thinking game where he had to categorise vechicles according to whether they travel on land sea or air.
I managed to find the file folder game at File Folder Farm. B absolutely loved this game and got 15 out of 16 correct on the first go! It has been much requested and repeated.
I managed to find the file folder game at File Folder Farm. B absolutely loved this game and got 15 out of 16 correct on the first go! It has been much requested and repeated.
Thursday, 27 October 2011
Sensory Play: Cloud Dough
Pinterest has done it again! This is the pin I found to this fun alternative to play sand.
Cloud dough is easy (and cheap) to make and worked beautifully with our sand moulds. The recipe calls for 8 cups of flour to 1 cup of baby oil, just mix together and that's it ready to use. I have to say that although the original post from Flights of Whimsy calls for baby oil I used cooking oil instead. Baby oil is actually toxic. If ingested it can cause vomiting and has been known to cause fatal asphyxiation when the vomit blocks the windpipe. Of course in these quantities it is not very much oil and if the children you are preparing it for are old enough not to put everything in their mouths then it does smell nice BUT for us it was a definite no-no. A, being the autistic kid he is, insists on exploring everything with his mouth despite being an 8 yo so just in case we went with the safer option. To make up for the lack of lovely smell we added some ground cinnamon to ours.
B really loved the smell and thought it smelled "yummy like cookies". The sand moulds went down well, then he decided that it was "snow" and went and got Bertie the Bus and drove him round and round into "snow-drifts" and pretended to rescue Bertie again and again. We also made "snowballs" by squeezing the mixture together and then made it "snow" by sprinkling the mixture from a height into the bowl; good for fine motor skills. It held his attention for over an hour and a half, something playdough has never done.
The clean-up was also easier than I expected since the mixture was not greasy or oily as I suspected it might be, a dustpan and brush followed by a damp cloth was all that was needed. All in all something I would make again.
Fine Motor Skills: Paper Plate Weaving
Continuing on with our half term activities we discovered this post over at Pinterest for weaving using a paper plate.
Here is R's first attempt (she is eager to make more!)
Here is R's first attempt (she is eager to make more!)
Not bad eh? Especially if you read the sparse instructions on the original post for how to thread the warp threads.
Here's how we did it.
First we chopped "spikes" into the rim of the paper plate.
Then we took a ball of wool for our warp threads (in this case we used white)
We tied one end of the wool to one of the spikes to secure it.
Next we took the wool across the front of the plate to the opposite spike.
Working clockwise we put the wool round the back of the spike then back across the plate to the next spike clockwise from where we started.
We continued going behind the spike and then across to the opposite one all round the plate.
We were left with a star shape of threads on the front of the plate and loops round the spikes (but no threads across the centre) on the back.
Next get your weaving thread - you could use a small ball of wool but we found a length threaded into a darning needle was much easier. Tie the end of the thread to the warp threads where they cross in the middle of the plate to secure.
Weave away.
As an aside if you have an odd number of spikes (like we did) you may find that the normal over-one-under-one ends up with the same threads being on top or below on each round (if you look at the pink circle above you will see what I mean) either alternate as you add a new length to your needle, or plan it better than we did and use an even number of spikes!
Wednesday, 26 October 2011
Sewing Practice : Hair clips and bird feeders
R has started to really get into sewing. This is a good thing but I am too often unavailable to help due to the boys. These are some projects that we have managed to do together recently though.
First felt hair clips (barrettes?)- just some of the designs we have made.
First felt hair clips (barrettes?)- just some of the designs we have made.
These are dead easy to make. First take your hair clip and place it on top of the felt you intend to use. Cut a rectangle that is slightly larger than the clip. Cut another that is the same size, you should now have one piece for the front and one for the back. Take the front piece and decorate with cut out pieces of felt, beads, sequins, embroidery stitches, buttons, in fact anything you fancy. The only thing that dictated what I used was that it had to be SEWN onto the piece of felt so that it would stand up to being worn more than once. Take the piece of felt for the back and using the clip as a guide cut a slit in the felt for the back of the clip to slip through (using felt means that this won't fray). Feed the "arm" of the clip through the slot and fasten as normal to hold it in place. Match up the the front and back pieces so the edges match, the decoration should be on the top and the front of the original hairclip inside the "felt sandwich". Sew the front and back together using a blanket stitch or running stitch. Done!
The other needle and thread practice we have been doing is threading monkey nuts onto thread using a needle. We also made a popcorn one (which was much easier, unroasted monkey nut shells are harder than I thought) but since it is also B's favourite snack it turned into a B feeder rather than a bird feeder! Here is the feeder as hung on the tree and photographed by R.


